As I’m sure you’ve noticed by now, I am a lover of pretty things. What sorts of things strike my fancy? Nature, calm and cool colors, lovely aromas (and, no, beauty is not always seen – sometimes it is encountered through the other senses!), warm drinks on cool days (few and far between here in Florida, lol), cozy hugs, old movies, etc. I’m sure you get the picture…
Not only do I love experiencing the pretty and beautiful aspects of life, I also love to make them. This is part of my WHY behind becoming a maker and starting an my shop (more on that in a later post!) This post was birthed out of my latest creative obsession and my desire to share how-to and DIY posts on this remade blog.
You see, it is fun to create, but it is incredibly rewarding to empower others to create.
I believe it is good for the soul – your soul AND mine. My commitment to you is to make things fun and attainable. Your commitment to me is to not take yourself too seriously and simply enjoy the process – whatever it looks like!
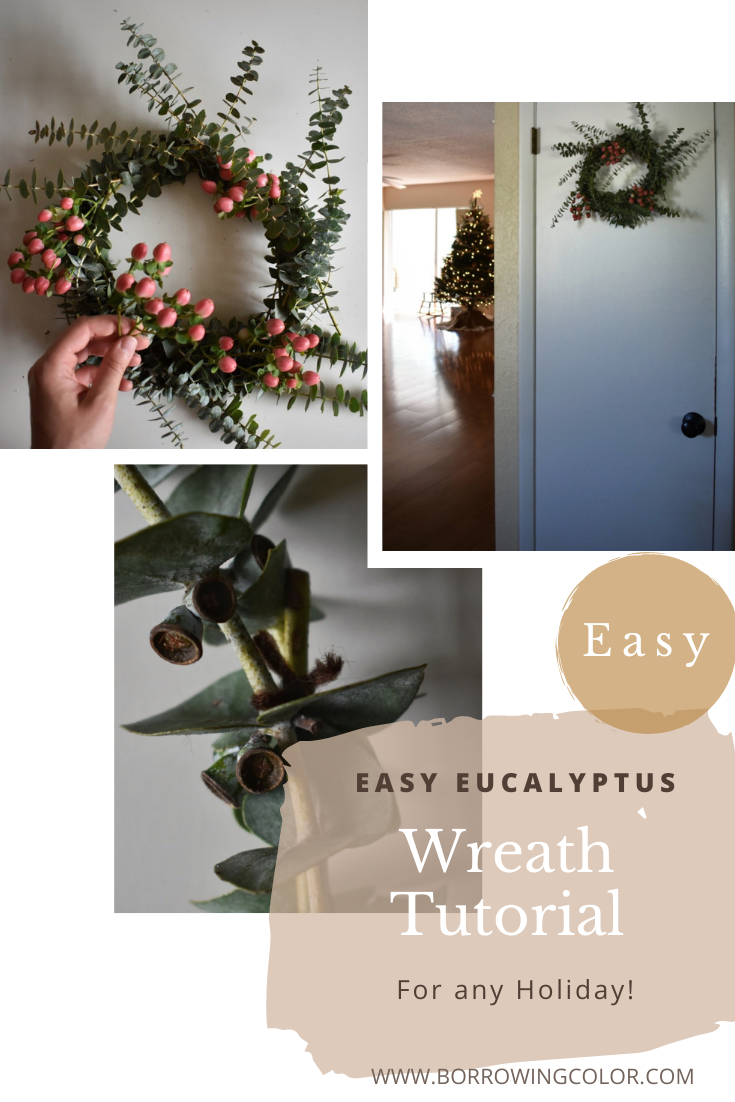
Have I convinced you to try the creative process? I hope so! Today’s tutorial is for a lovely (and easy!) Eucalyptus Wreath. I promise you will love having this in your home! Its aesthetics are gorgeous and its scent is heavenly!

So let’s get started, shall we?
Supplies
- Several bunches of eucalyptus stems (I used 3 bunches from Trader Joe’s)
- Yarn or twine
- Scissors
- A few bundles of berries (optional)

Wreath-Making Process
- Take two sturdy stems of eucalyptus and gently bend them into an arc. You will be connecting the top of one stem to the bottom of the other stem and vice versa.
- Using a short piece of yarn or twine (I used yarn,) tie the ends of the stems to the tops of the stems – forming a rough circle.
- Take a few more stems and lay them onto the circle pattern. Tie these to the original two. (I recommend staggering the connected ends thoughout the circle so that it is stronger.)
- Once you feel that your circle is sturdy, you can continue adding eucalyptus. I decided to tuck, twist, and thread each new stem into the existing ones – instead of tying them on. (This kept the yarn from being visible on the finished product.)
- Continue adding eucalyptus stems until you run out or until you like the fullness of your wreath.
- (Optional) Tuck a few berries bunches in between the strands of eucalyptus for a festive feel! (If you dislike the look of the berries once they dry out, you can always remove them later on.)
- To hang your wreath, add a loop of yarn onto the back of the wreath. (Be sure it is attached to one of the original stems that you tied together!)
- Your wreath will smell AMAZING while it dries. As long as you did a good job of properly securing the stems, it should hold its shape forever! Eucalyptus dries beautifully and is the prettiest accent in your home.
Note: I have kept my wreath indoors. I am not certain how it would hold up in an outdoor environment.


I’ve created a time-lapse video to show you the wreath-making process. You can find it here:

This wreath was the perfect Christmas decoration in my home. And once the new year rolls around – I will simply remove the holiday berries to have a lovely year-round wreath!


Will make a similar wreath? I think that dried plants look so much more beautiful than their fake counterparts! Be sure to leave me a comment if you make one for your home!
xo Alex


Leave a comment